Showing posts with label country cottage. Show all posts

Monday, August 31, 2015

#cottage renovation...bathroom update with lots and lots of white paint

Seriously!  This is what the bathroom at the cottage looked like when we bought it.  Pretty original and not in a good way!  Infact this photo makes it look like the colours were kind of vintage charming, when really they were just dirty, and don't get me started on the vanity.  

I would love to have gutted and started again, but we are saving our pennies for other projects.  Something had to be done though.  After reading lots of online reports we decided to paint everything white.  The blue walls are plaster so we could use acrylic, but the pink bits are plastic (yes plastic!).  Plastic needs special paint and we went with White Knight Laminate Paint & Primer.  Now I should say that all the hard work was done by Mr B, and he reports back it was hard work.  Not difficult but a lot of effort.  

First you have to clean and sand the surfaces really really well.  This takes 90% of whole time of the job, but if you don't do it well the product won't work well.  If you aren't prepared to do a whole lot of sanding this product is not for you.  Once the surfaces are prepared, cleaned and dried, paint on the White Knight Tile & Laminate Primer.  Once the primer is dry paint with White Knight Laminate Paint.

Safety note!!!  The paint has really strong fumes, extremely strong, so do not start without first buying a good quality mask and goggles that you can wear comfortably while you are painting.  Mr B said he could only be in the room for about half an hour at a time before the fumes really started to get to him.  Even with the windows wide open he had to outside for lots of breaks.  This little room took two whole days to do, and a lot of effort.  But for around $250 you have to admit the results are pretty good (the photos are not the best I know it really is a tiny space and hard to photograph).

With a lot of elbow grease and a lot of white paint it's gone from very very yucky to fresh and bright and spotlessly clean.  We could not salvage the vanity, it was truly horrid, so we bought the Hemnes/Rattviek from Ikea.  It fits in well with the country style, has a generous sink and lots of storage.  So much better and good value too!

There is still a little way to go, that is why I called it "better" rather than "after".  We were going to paint the tub but now I rather like the sky blue, it may stay, what do you think?  I would love to paint the floor in a blue, white and grey pattern, maybe an encaustic style pattern.  The trim still needs painting too.  But it is clean and whole lot better that what we started with.

Monday, August 10, 2015

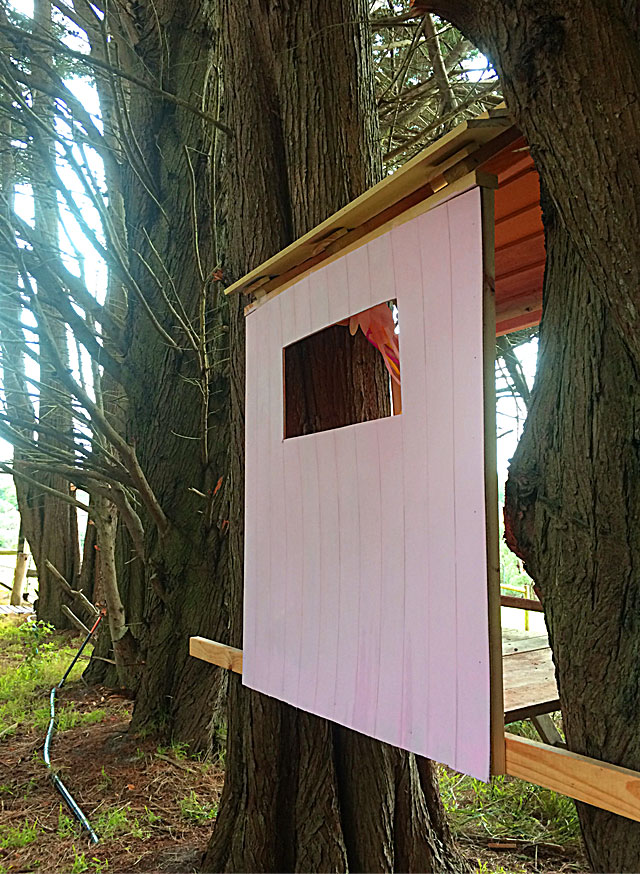
currawong cottage... a magical tree house

A magical tree house at Currawong Cottage built by Mr B for Miss J.  A place to play and dream and spot kangaroos.  Painted pink & orange (well coral because we couldn't mix orange) for fun & decorated with holiday craft jellyfish.  Magical memories in the making.

A wintry sky view.


Coral pink, next time we will make it more orange and build a wall and a door!

Tree house love - I had lots of trees to climb as child but never a tree house as cool as this one.
Book your stay at Currawong Cottage, the perfect spot to explore the Mornington Peninsula from.

Monday, July 27, 2015

diy bedside pendant lamps ... part 2

Mission accomplished.  From design (below left) to finished installed product (below right).  What do you think?  I could not be more pleased with them.  Click here to see how I made the wooden structure, for more on the cord and installation read on below.

For this part of the project you need 2 extension cords, two lamp holders for pendants with a built in switch, and two lamp shades.

Step 1 - "piggy back" extension cords
I bought two 5m "piggy back" extension cords from Bunnings.  5m seems quite long but the next option down is 3m which is to short.  I also recommend the "piggy back" version as it means you don't use up all the plug points in your room, because the "piggy back" fitting has a plug on one side, and a plug point on the other.

Step 2 - attach the lamp holders
Next, cut off the socket end of the extension cord.  The lamp holders are going to be attached to this end BUT you need to thread it through the holes in the cross piece before putting it on.  Hold it up against the wall to make sure you have threaded it the right way.  Attaching the lamp holder is as easy as changing a plug.  You can see a close up of this type of fitting here.
For safety I am not going to explain how, ask your local hardware if you need help.

Step 3 - attach lamps to the wall
You will need to drill two holes (you can see them clearly on the left below) in the wooden upright that you are going to attach to the wall.  I used a countersink drill piece so that the screws sit into the wood, I could fill them and paint to get a completely smooth finish but I like how it looks for now.
Only drill this hole half way into the wood, then get a bit the same size as your wall screw and drill the hole right the way through.  Position the fittings where you want them and mark the wall through these holes so that you have the correct position.  Then use the appropriate wall fitting to attach them securely to the wall.


Once they are up you can add your choice of pendant or lamp shade.  These ones were $9.99 each from Bunnings and perfect for my white on white scheme.

You could go out and buy one of those pretty colourful pendant cords and use them in this project, but there are two problems.  First they are pendants and don't have a plug fitting which means you are going to have to attach one yourself.  The second is that the flex cord may be to short for your project remember to measure what you need.  If you want to use a colour flex contact an electrical specialist store and they will be able to get them for you.

So I am delighted with the project.  I can't wait to do another project soon.  Planning planning!

Thanks to Worx tools for letting me test drive the brushless motor drill.  I really love it and you can read all about why in the previous post.  As always all opinions are entirely my own.


Monday, July 20, 2015

diy bedside pendant lamps ... part 1

This one is a goodie.  You may remember that Mr B made these very gorgeous pendant lamps for our bedroom at the cottage.  Well I wanted to have a go too, but clearly my woodwork skills are a little less accomplished so it would have to be a bit more simple.  I came up with the design below, two pieces of wood with the pendant threaded through it.  A good project for testing my new Worx Tools brushless motor drill.  Below you can see my very simple design, two pieces of wood joined at right angles with some long screws & the cord (in yellow) threaded through, finished with a pendant shade.  

Two things I have learned from wood work lessons with Mr B.
Lesson 1 - the finish is much neater if the edges you are joining are perfectly straight and square.
Lesson 2 - Clamps are your friend, clamp your pieces together before you join them, clamp them to the work bench, and clamp in stabilisers.  You can never have to many clamps.  All this effort is going to keep the wood still while you are drilling & glueing and will give you a much better finish.

So no surprises that clamping everything together is where this project begins.

Step 1 - clamp everything together securely.
You can see below I started by clamping the long piece of wood to the edge of the table.
Then I positioned the second piece of wood at right angles and used a spare piece as a stabiliser and to make sure the join is exactly at right angles.  I clamped the stabiliser to the first piece and then clamped the second piece across the stabiliser.  This may sound confusing, just find your own way and make sure everything is held down tight.

Just a quick look at how the finished piece is going to look when it is put together.  Tutorial continues below.

So Step 1 was to clamp everything down (below left)

Step 2 - Predrill the holes in the piece that will go against the wall
This means you don't have to push so hard when you drill in the screw & in my experience this means I can drill straighter. I also used the Kreg bit to create a countersink hole which means the screw head will sit flush with the wood.  When you come to hanging the light this means the wooded upright will be able to lie flush against the wall.  You are going to thank me for suggesting this now.

Step 3 - Glue and Screw
Put a little wood glue on the surfaces you are going to join and screw together.

Step 4 - Clamp and let it dry
Leave it all securely clamped until the glue is dry and you are done.

Step 5 - Drill the holes in the cross piece for the cord
I forgot to photograph this step.  Just make sure your bit is a little bigger than the cord.  Pretty straight forward.

I am going to show you the finished product and discuss the cord in another post, once it is installed in the cottage bedroom.  

I am going to end with some comments on the Worx Brushless Drill that I used for this project.
We have another drill, a standard good product used by most trades, and I was given this one by Worx to road test.  I love it, and I am not just saying this because it was a gift, my opinions are always my own.  But I really love love love this drill.  

  • Firstly the brushless motor means that it is a little lighter than the normal drill which makes it feel better to use, especially if you don't have super muscular arms like me.  
  • Secondly the trigger has a really good action, it seems to be smoother than my other drill and definately allowed me to apply pressure more steadily which meant I had more control.  
  • Thirdly, the light is on the base of the handle and shines up at the drill bit, sounds minor but it's just a better position and makes where you are drilling easier to see.
  • Fourth, it has a really good driver bit that slots into a space on the handle for quick storage.  If you have spent hours hunting for drill bits like I have you will understand why this is a good feature.
  • Finally, the set came with two batteries.  This means you are never out of power in the middle of your project.  Batteries are expensive so a set that comes with two is a bonus.
It is going to look fab so looking forward to sharing the finished piece with you soon.
See part 2 of the finished piece here.


Monday, July 13, 2015

currawong cottage...winter update

Some new pics of Currawong Cottage.  Looking so pretty now that it is getting some finishing touches.  Lots and lots of trim still to paint but seeing how far we have come gives me the energy to carry on.  And very very exciting news!!!  If you like the cottage you could spend a weekend there yourself!  See our Currawong Cottage website for rates and availability (and because it is pretty too).

We couldn't do any painting this time, it was just to cold and it was taking to long to dry, but we hung curtains, fixed the kitchen counter tops, build a bench seat and finished the entrance, hung lamps and arranged furniture in the third bedroom, added some decorative country pieces, and just generally had fun.  


Pop by the Currawong Cottage website and let me know what you think. 

Monday, June 29, 2015

pecan nut shortbread... memories from my granny

These are my favourite biscuits ever!  Not only are they a delicious short bread with a dusting of icing sugar for sweetness and pecan nut for crunch, but they are also the biscuits my granny used to make for me when I went to spend holidays with her on her farm.  I remember the old biscuit tin they were kept in, drinking sweet hot tea out of my "small" Spode teacup, the cool feeling of slate underfoot and the smell of hot, dry, dusty highveld air.  Treasured memories of the place I most loved being when I was small.

Recently I made them with Miss J for the first time, you can see her "helping" me with the butter.  It is a great recipe to make with children because the dough is rolled into little balls, perfect for little hands.  To make you own follow the simple recipe below, and enjoy.

Ingredients:
  • 2 cups of plain flour
  • 250g butter - softened to room temperature
  • teaspoon of vanilla essence
  • 1 packet (80g) pecan nuts - broken into pieces
  • 4 heaped tablespoons of icing sugar
  • icing sugar for dusting (around 2 cups in all)

To make:
  • Cream butter and sugar until well blended 
  • Add vanilla essence & blend
  • Add flour and mix until a rough dough forms
  • I do all the steps above in my food processor
  • Add the pecan nuts and mix the dough gently until all flour is blended.  Be gentle, this dough doesn't like to be overworked.
  • Roll into bite size balls.
  • Place in an oven preheated to 200C and bake until they are golden but not brown - around 20 minutes.  
  • Allow to cool
  • Once totally cool roll in icing sugar and store in a well sealed jar or tin

Now simply enjoy with your tea or coffee.  Mmm mmm

Found the lovely birdie cookie jar at my favourite $2 shop.  I am going to take it to the cottage on our farm to store holiday biscuits for my own children, hopefully creating the holiday biscuit memories all over again.

Thursday, June 25, 2015

mid winter...in the country

I can't wait to be back beside the fire at the cottage this winter.  A good place to spend  a winter's evening.

Lots of projects to finish, time for walks with coats and boots, stew on the aga, a little bit of winter is a good thing.

Thursday, June 4, 2015

country cottage...the final bedroom

When we moved into the cottage almost a year ago I only focused on getting two bedrooms ready to use.  There was just to much else to do.  But now that most of the really tough stuff is done, and we are having people to stay a little more, we need to get the third bedroom up to scratch.  I am thinking Scandi meets Ralph Lauren Alpine Lodge.  A little bit of plaid, a lot of white, soft white curtains, a peg rail for hanging a few things up.


Image above left: Kate's Creative Space; above right via Gabriels Webb; top 3 images via Ralph Lauren.
The exciting news is once the room is done our little cottage is going to be available for weekend and holiday rentals.  So watch this space if you want a little getaway in country Victoria.

Monday, March 9, 2015

cottage renovation...progress report

Around 6 months ago we bought a very ugly duckling in the Victorian countryside.  It's been hard work but its coming along.  
We are working on the bathroom and kitchen right now.  Lots and lots of paint needed, lots and lots.  Here are before and afters of the rooms so far in case you missed some of them.
The living room - bargain carpet and coffee table
The dining area - love that bench seat!


The girls bedroom - with dresser transformed with Annie Sloan paint


Main bedroom - just love this one

More coming soon - still so much to do!


Thursday, February 19, 2015

cottage renovation...main bedroom

This funny dirty room with to many doors has become a serene retreat for afternoon snoozes and lazy mornings.  That is if we ever have an afternoon without diy in it!  This is one of the before and after projects I love most, the room was just so dirty and ugly before.  My wonderful hubby closed an extra door that opening into the living room and put lining board panelling across the wall behind the bed.  Neatly taking care of all plastering problems and creating a subtle feature.  Scroll down to see just how impressive this change was.

Dirty paint, cracked cornices, peeling ceiling, ugly curtains and pelmets, this room was full of ugly.

Closing up the extra door gave us a larger space to put the bed against and the panelling created a subtle textural feature.  Good looking and time saving, you got to love that!


I love the soft grey wall with the crisp white of the rest of the room.  It took coats and coats of paint to stop the yellow of the wood trim coming through.

It doesn't even look like the same room!  It looks twice the size we started with!  The colour scheme centres around the gorgeous knitted bed cover that was given to me by a friend.  I found patterned grey and white sheets that feel a bit Ralph Lauren, and added just a little bit of yellow in the cushions and lights.

The bedside tables were repurposed from home and given a fresh white finish.

My amazing hubby made these wonderful wall sconces, I love how the yellow cable pops off the grey wall and the old style globes create a lovely soft light at night.  You may have noticed that only one light is up in these photos.  The other one made it up a few months later but I haven't been back to see them yet.  I will post an update next time I visit.

The final touch was adding the linen look curtains, again in a pale grey.  I found this fabulous poly linen mix at Bargain Fabrics.  It looks like linen but won't be affected by the sun and won't stretch or shrink.  Making them was a labour of love and took several days of sweating at the sewing machine.  I'll tell you all about it in another post. 

Just a final reminder of what it looked like before...and after.  Hooray!

Thursday, February 5, 2015

cottage renovation...diy wall mounted copper lamp

This was a cheap and easy lamp with big style points, and I needed good achievable value in this budget rennovation.  The corner of the living room needed a lamp, but the cheapest standing lamp I could find was around $150 and not very pretty.  So inspired by all the copper projects I have seen out there I decided to make my own.

You will need:

  • lamp holder for pendant with built in switch
  • 1 tube of copper pipe
  • 1 x copper L-bend connector
  • 2 x copper saddle fittings
  • 1 x lampshade
  • 1 x 5m extension cord
  • hacksaw

To make:
  • Use hacksaw to cut pipe in half
  • Cut plug end off extension cord (not the end that plugs into the wall) and thread through pipe, L-shaped connector, second piece of pipe
  • Connect 2 pipe pieces uses L-shaped connector
  • Attach lamp to wall using saddle fittings
  • Attach lamp holder to cut end of extension cord and pull through the pipes until it is the correct drop length.
  • Plug into wall and use
I am not going to talk about how you attach the lamp holder to the electrical cord.  If you can change a plug you will be able to do this bit of work but if you are worried get an electrician to help.  

The cost of all the parts including the lamp shade was around $40 and it took me about 2 hours to make and hang.  

I am just sorry that the photo's are not a bit better.  The day I shot these pics was rather dark and I battled to get the lampshade visible against the white wall.  To much white on white and not enough contrast.

The arm swivels well and can be adjusted to just the right position easily.
Super pleased with it and I think they would make really good bedside lamps too.  

Monday, February 2, 2015

cottage renovation...dining space

Looking at the progress we made in these photos is very rewarding.  The original dining area was poky and saturated with yellow pine.  But the window looks out into the garden and little orchard and is flooded with north light all day, it had potential.

The biggest change is from opening out the wall between the living room and kitchen.  It feels so lovely and open and we can turn the table around making more space for people to sit down.  My favourite change is the bench seat built by the clever Mr B.  I have always wanted a window seat and this one is the perfect place to sit and rest during the day, or enjoy a cup of coffee.

This is what it looked like before...

And these pics are once the wall between the living and kitchen was taken down.
I made the cute cowhide cushions, ran out of fabric so still need to finish the third one, and they are perfect to soften the wooden back.  I loved seeing all the family cuddle up here during the day.  We had our second dinner party and managed to squeeze in nine people, we could never have managed more than five before.

The final change was painting everything white.  It was incredible to see the change this made. The space looked bigger again, white certainly tricks the eye.    It all looks amazing with the burlap lamp shade from Honeybee Homewares, and a few pieces of greenery from the garden.

I am looking forward to doing a little less diy, and a little more relaxing on that window seat this year.