Showing posts with label wood work. Show all posts

Monday, August 10, 2015

currawong cottage... a magical tree house

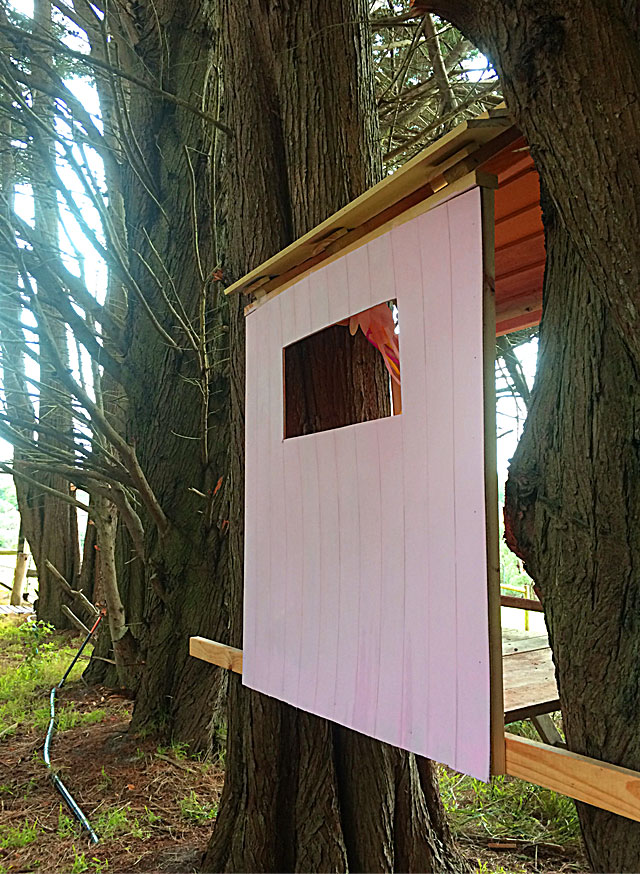
A magical tree house at Currawong Cottage built by Mr B for Miss J.  A place to play and dream and spot kangaroos.  Painted pink & orange (well coral because we couldn't mix orange) for fun & decorated with holiday craft jellyfish.  Magical memories in the making.

A wintry sky view.


Coral pink, next time we will make it more orange and build a wall and a door!

Tree house love - I had lots of trees to climb as child but never a tree house as cool as this one.
Book your stay at Currawong Cottage, the perfect spot to explore the Mornington Peninsula from.

Monday, August 3, 2015

Framed modern art...diy made easy with the right tools

I am feeling liberated.  After a morning tinkering with my new Ryobi Compound Mitre Saw and Ryobi Nail Gun and I am ready to take on a whole lot more wood work.  I am nervous of Mr B's saws, now finally I have one that I am confident to use on my own, no more waiting for help!  Today I tested them on a project that I have been wanting to try for a while, making a floating frame for a canvas.  It was a gratifyingly short job with the help of the Mitre Saw and the Nail Gun and I love how the finished piece looks below.  

A couple of things I really like about the Ryobi compound mitre saw:
  • it has a laser guide which allows you to cut exactly where you marked the wood.
  • a simple but effective clamp to hold the wood in place and make sure your fingers are nowhere near the blade.
  • a great sliding action for larger pieces which allows a really smooth cut and allowed good control.
  • An easy to use mitre setting, you simply swing the front arm until it gets to the correct angle that you want, then lock it firmly into position with the front lock.
You can see below how clearly the laser line marks the wood, it is easy to match to the pencil line and make a really accurate cut.


To make your own basic floating frame you will need:
  • Any canvas - mine was a failed painting hiding in the garage
  • Wooden trim slightly wider than the depth of the canvas frame
  • Enlarged photo copy an image you like ($7 for B1 size at Officeworks)
  • Magic tape
Make as follows:
  • Tape photo copy to the front of the canvas, like wrapping a one sided present.  Make the corners as neat as possible and tape down securely.
  • Cut long sides of wood trim - measure them to be the same length as the canvas sides and mark the cut line in pencil with a set square.
  • Turn the laser guide on, match up the red laser line with the cut on the wood and lock wood securely into place.  
  • Clamp both side pieces to the sides securely and get your nail gun.  (Love the nail gun) Nail trim at left, then at right.  Start at the side so that you can adjust the piece if you need to.  This is the work of minutes and really really fun!
  • Cut the trim for the top and bottom pieces of the frame.  Measure these pieces from the edges of the already attached trim.
  • Cut, clamp and nail gun in place as before.
Yes it really was that easy.


What I really liked about the Ryobi Airstrike nail gun:
  • This model compresses its own air and doesn't need a stand alone compressor or canisters.  Less things to hire, buy and store.
  • Not to heavy, easy enough for a non-chippy like me to use
  • An easy nailing action and the ability to set nail depth
  • I cannot hammer in a nail straight, but with the Air Strike...to easy.
I am going to be making so many things with these fab new additions to the tool shed.
Next time I am going to try something a bit more complicated and use all that fabulous mitre capability.  Can't resist a final action shot.


So this was really a very easy test, I just couldn't wait to make something and give you a little feedback.  Mr B will be putting them through their paces when he replaces the cladding in the Currawong Cottage entrance.  I am thinking I may make a tray next, I want to test out the mitre capabilities.

Tools were provided by Ryobi but all opinions are as always my own.
Monday, July 27, 2015

diy bedside pendant lamps ... part 2

Mission accomplished.  From design (below left) to finished installed product (below right).  What do you think?  I could not be more pleased with them.  Click here to see how I made the wooden structure, for more on the cord and installation read on below.

For this part of the project you need 2 extension cords, two lamp holders for pendants with a built in switch, and two lamp shades.

Step 1 - "piggy back" extension cords
I bought two 5m "piggy back" extension cords from Bunnings.  5m seems quite long but the next option down is 3m which is to short.  I also recommend the "piggy back" version as it means you don't use up all the plug points in your room, because the "piggy back" fitting has a plug on one side, and a plug point on the other.

Step 2 - attach the lamp holders
Next, cut off the socket end of the extension cord.  The lamp holders are going to be attached to this end BUT you need to thread it through the holes in the cross piece before putting it on.  Hold it up against the wall to make sure you have threaded it the right way.  Attaching the lamp holder is as easy as changing a plug.  You can see a close up of this type of fitting here.
For safety I am not going to explain how, ask your local hardware if you need help.

Step 3 - attach lamps to the wall
You will need to drill two holes (you can see them clearly on the left below) in the wooden upright that you are going to attach to the wall.  I used a countersink drill piece so that the screws sit into the wood, I could fill them and paint to get a completely smooth finish but I like how it looks for now.
Only drill this hole half way into the wood, then get a bit the same size as your wall screw and drill the hole right the way through.  Position the fittings where you want them and mark the wall through these holes so that you have the correct position.  Then use the appropriate wall fitting to attach them securely to the wall.


Once they are up you can add your choice of pendant or lamp shade.  These ones were $9.99 each from Bunnings and perfect for my white on white scheme.

You could go out and buy one of those pretty colourful pendant cords and use them in this project, but there are two problems.  First they are pendants and don't have a plug fitting which means you are going to have to attach one yourself.  The second is that the flex cord may be to short for your project remember to measure what you need.  If you want to use a colour flex contact an electrical specialist store and they will be able to get them for you.

So I am delighted with the project.  I can't wait to do another project soon.  Planning planning!

Thanks to Worx tools for letting me test drive the brushless motor drill.  I really love it and you can read all about why in the previous post.  As always all opinions are entirely my own.


Monday, July 20, 2015

diy bedside pendant lamps ... part 1

This one is a goodie.  You may remember that Mr B made these very gorgeous pendant lamps for our bedroom at the cottage.  Well I wanted to have a go too, but clearly my woodwork skills are a little less accomplished so it would have to be a bit more simple.  I came up with the design below, two pieces of wood with the pendant threaded through it.  A good project for testing my new Worx Tools brushless motor drill.  Below you can see my very simple design, two pieces of wood joined at right angles with some long screws & the cord (in yellow) threaded through, finished with a pendant shade.  

Two things I have learned from wood work lessons with Mr B.
Lesson 1 - the finish is much neater if the edges you are joining are perfectly straight and square.
Lesson 2 - Clamps are your friend, clamp your pieces together before you join them, clamp them to the work bench, and clamp in stabilisers.  You can never have to many clamps.  All this effort is going to keep the wood still while you are drilling & glueing and will give you a much better finish.

So no surprises that clamping everything together is where this project begins.

Step 1 - clamp everything together securely.
You can see below I started by clamping the long piece of wood to the edge of the table.
Then I positioned the second piece of wood at right angles and used a spare piece as a stabiliser and to make sure the join is exactly at right angles.  I clamped the stabiliser to the first piece and then clamped the second piece across the stabiliser.  This may sound confusing, just find your own way and make sure everything is held down tight.

Just a quick look at how the finished piece is going to look when it is put together.  Tutorial continues below.

So Step 1 was to clamp everything down (below left)

Step 2 - Predrill the holes in the piece that will go against the wall
This means you don't have to push so hard when you drill in the screw & in my experience this means I can drill straighter. I also used the Kreg bit to create a countersink hole which means the screw head will sit flush with the wood.  When you come to hanging the light this means the wooded upright will be able to lie flush against the wall.  You are going to thank me for suggesting this now.

Step 3 - Glue and Screw
Put a little wood glue on the surfaces you are going to join and screw together.

Step 4 - Clamp and let it dry
Leave it all securely clamped until the glue is dry and you are done.

Step 5 - Drill the holes in the cross piece for the cord
I forgot to photograph this step.  Just make sure your bit is a little bigger than the cord.  Pretty straight forward.

I am going to show you the finished product and discuss the cord in another post, once it is installed in the cottage bedroom.  

I am going to end with some comments on the Worx Brushless Drill that I used for this project.
We have another drill, a standard good product used by most trades, and I was given this one by Worx to road test.  I love it, and I am not just saying this because it was a gift, my opinions are always my own.  But I really love love love this drill.  

  • Firstly the brushless motor means that it is a little lighter than the normal drill which makes it feel better to use, especially if you don't have super muscular arms like me.  
  • Secondly the trigger has a really good action, it seems to be smoother than my other drill and definately allowed me to apply pressure more steadily which meant I had more control.  
  • Thirdly, the light is on the base of the handle and shines up at the drill bit, sounds minor but it's just a better position and makes where you are drilling easier to see.
  • Fourth, it has a really good driver bit that slots into a space on the handle for quick storage.  If you have spent hours hunting for drill bits like I have you will understand why this is a good feature.
  • Finally, the set came with two batteries.  This means you are never out of power in the middle of your project.  Batteries are expensive so a set that comes with two is a bonus.
It is going to look fab so looking forward to sharing the finished piece with you soon.
See part 2 of the finished piece here.


Wednesday, March 25, 2015

bedroom credenza reveal...diy tips for making your own

My first piece of furniture, well I helped even if I can't claim I build this myself.  My fabulous hubby showed me how and I did a lot of sanding, prep and painting, but I was a bit nervous to do the drilling on such fine legs.  Even with my trusty kreg-jig I am not all that good at drilling straight.  With a lot of help, and a lot of spray paint (see technique tips below) the credenza went from a drawing to reality and I am delighted with it.  This won't be my last wood work project.
Wood work tips
For those who want to make their own the legs are 3x3cm of Tasmanian oak.  The top is 45 x 180cm laminated pine, and its stands 70cm high.  We used the kreg-jig to make the base and attach the top.  

The only problem with a kreg, and this is why I was nervous to join everything myself, is that even if your pieces are very square they are pulled slightly out of shape as you join them.  We found the best solution was to clamp the 4 pieces of each side of the frame together, before joining them.  You need a lot of clamps and patience, it doesn't take that long but it is a bit fiddly.
Spray painting tips
I used at least a can of spray paint more than I should have before I got my technique right.
Turns out I had the distance from the wood right, and I was spraying nice and steadily, but I was moving to fast.  This made the paint all spackely and rough, not the glossy finish I was going for.  

Slowing down the speed of my strokes a lot delivered a lovely glossy finish with no stripes or drips.  I sprayed across the width of the piece taking the spray right off the edge on each side to prevent pooling on the edges.
Hope that helps, this video helped me with technique the most.

Mr B also made the mirror which is my favourite piece in the room.  He cut small wooden "tiles" for the frame to create an effect something like bone furniture, actually I prefer it to the bone mirror we do have.  

If you do have the skills and patience you will be rewarded with big savings.  A similar table will set you back at least $400, ours cost $80 including wood and paint and took a day to build, and several days to paint properly.

Our room finally feels finished, for now of course.  It's never long before I start moving the furniture around again.